Introduction:
The holiday season is a joyful and fun time for the little children. What a better way to get them into the festive spirit other than by creating easy christmas tree in their very own way by using the waste materials available at home? This article Easy christmas tree making ideas for kids at home will really guide you and the little ones that how to create easy Christmas tree making at home.

These activities are not only fun but also helps develop fine skills, creativity, and a sense of achievement after giving the idea in to shape. So, just collect the required materials and get ready for some amazing holiday crafting with your little ones!
We wil be guiding multiple types of Christmas Tress making ideas at home namely:
Christmas Tree by using Cardboard
Materials Required
- Large piece of cardboard
- Green paint
- Paintbrush
- Scissors
- Decorative items (stickers, sequins, glitter, etc.)
- Glue
- Star or tree topper
Step-by-step instructions:
- Just start by drawing a large triangle on the cardboard with pencil or sketch pen. Make it as big as you want your tree to be. just draw it same way as in school drawing home work.
- Now make sure to cut it carefully in to the triangle shape by using scissors. Adult supervision may be required for younger children. They should not harm their selves so better adults can do this step by their own and kids may observ how it is getting done.
- Take the paint and make the cardboard triangle in green color. If you want to make your own shades and texture, try own your imagination and create some new colors or may be Let your child mix different shades of green to create a more realistic tree color if require. Make sure not to mix in full just for the testing purpose make the small color mixure and check if you are getting the desired one.
- Just keep the painted thing aside so that it will be dry completely. This may take about 30 minutes to an hour and before touch it again make sure it is completely dry.
- Just check if its realy dryed then start its decoration. Let your child’s imagination run wild and decorate it in several different ways. Like by using stickers, sequins, or glitter or the small balls to create ornaments on the tree to make it good looking.
- If you want to give it a 3D effect, just cut small slits along the edges of the tree and fold them outward slightly and this will give it a 3D effect.
- Now, Glue a star or other tree topper to the top of the tree.
- Display the finished tree by propping it up against a wall or creating a small stand using extra cardboard.
Christmas Tree by Paper Plate
Materials Required:
- 3 numbers of paper plates
- Green paint or other optional colors
- Paintbrush
- Scissors
- Decorative items (pom-poms, sequins, stickers)
- Glue
- Yellow paper or felt for the star
- Stapler (for adult use only)
Step-by-step instructions:
- In the first step, just Paint all the three paper plates in green color on the both sides. keep it aside and wait so that it will be completely dry.
- Check if it’s realy dry then, cut one plate in half size and other plate into quarters size, and keep the third plate whole.
- Now after the cutting works, Arrange the plates to form a tree shape. Place the full plate part at bottom and the other two halves in the middle (in such a way that they are overlapping slightly), and the four quarters at the top.
- Get the help from some one who is adult for staplling the plates together. Only steple the place of overlapping so that it will form a tree shape. Just make some tweaks and make sure it look like a tree.
- Now this step is more interesting one, its called decoration. Let your child stick the glue and sequins, or stickers onto the tree to represent ornaments.
- Now Cut the yellow paper into a star shape and glue it to the top of the tree so that it looklike real stars.
- Just to add the flair, you can punch holes along the edges of the plates and thread ribbon or tinsel through them and hang the small balls or gifts from it.
- Display your paper plate tree on a mantel or hang it on the wall using removable adhesive strips.
Christmas Tree by Popsicle Stick
Materials Required:
- 20-25 popsicle sticks
- Green paint or other colors optional
- Paintbrush
- Glue
- Decorative items (buttons, beads, mini pom-poms)
- Ribbon
- Small wooden star or yellow paper star
Step-by-step instructions:
- Now at the first step, start painting all the popsicle sticks in green or any other color (if you want), try mixing and matching the other color sheds to get some new color. DO not mix it all and just try to mix and match with smaller quantities and do it until get the desired color. After the paint keep it a side so that it will be dr completely.
- Check once if its dried completely then, arrange 15-20 popsicle sticks and arrange in such a way so that they all make it in a triangle shape and form the tree. Carefully be causcious that the sticks should decrease in length as you go up the tree.
- Get the Glue and stick the popsicle together at the place where they overlap each other. Make sure that the applied glu also dried properly. If its not dried do not touch else the shape will be deformed and you will not get the desired shape of the tree.
- Its time to create the trunks of the tree. Now for making the trunk, glue two popsicle sticks in vertically at the bottom center of the triangle and make it as a trunk.
- Now it’s decoration time, just collect the abandant buttons, beads, mini pom-poms etc. and glu it on the tree to create ornaments from it.Try to use your imagination power and decorate it well and create the elegant look of the tree.
- While decorating, also tie a small bow with ribbon and glue it to the tree as a garland. This will give the tree a unique look and royal touch.
- Put the starts at the top, use the wooden star or that yellow paper star and glu it at the top of the tree.
- Just to make it more stable glu additional popsicle sticks on the back side of the tree in the X or say cross shape. This will support our tree to stand still upton its own and it will not be shaky by this additonal supports.
- Finally, Place your popsicle stick tree on a shelf or mantel for a cute, rustic decoration.
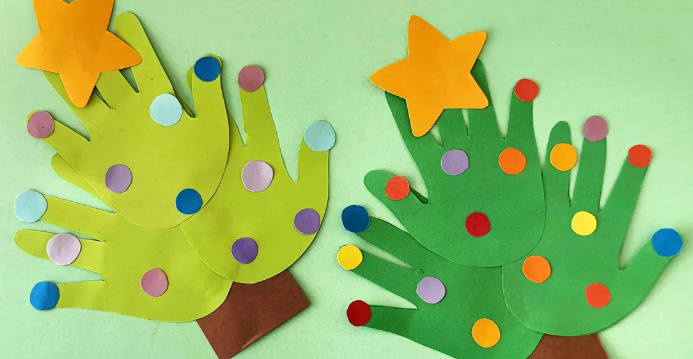
Christmas Tree by Handprint Material
Materials Required:
- Large sheet of paper or canvas
- Green paint or other optional paints
- Brown paint or any other optional paints as desire
- Paint brush or sponge
- Washable markers or crayons
- Glitter glue (optional)
Step-by-step instructions:
- First thing first, Start with a clean sheet of paper or you may also use canvas for this. Make sure it should be clear, clean and dry.
- Now Pour some green paint onto a paper plate or palette. If you want to mix and match then play with the other colors and obtain the required color. just to make sure not to mix all.
- Give the glimps of the Tree making to your little once also, Let your child dip their both the hands into the green paint color, making sure to coat the entire palm and fingers.
- Just give the small guidence to your child and tell to press their hand onto the paper, make sure that all the fingers pointing downwards. This is required to create the first layer of the tree. I am sure the children will definately enjoy this task.
- Again, Repeat the same process just to be carefull that this time, slightly overlapping on each handprint required and it should be moving only upward and in this way it will create a shape of tree.You may need to reapply paint between prints and make repeate it same again and again.
- After this step, make sure that the hand print paint dried completely. If its not dried wait for some time and see if its completely dry.
- Once it is completely dry, use the brown paint to make the trunk which is situated at the bottom of the tree. The child can either paint this with the help of brush also or the thumb will also works perfectly. Use the thumb or the brush to make the prints of trunk.
- Now ready to decorate it. Use the washable markers or crayons colors to draw ornaments on it, make the designer garlands and beads, buttons or lights on the tree.
- In case you want to make it extra sparkle, add dots of glitter glue to represent shiny ornaments or tinsel. It will look good and unique.
- Put this handprinted christmas tree on the refrigerator or inside the photo frame and keep this memory long lasting..
Christmas Tree by Tissue Paper
Materials Required:
- Green tissue paper (or any color)
- Cardboard or thick paper for the base
- Scissors
- Glue
- Decorative items (sequins, glitter, small pom-poms)
- Star for the top decoration
Step-by-step instructions:
- Firstly cut a large triangle shape. Use the cupboard for make the stronger base fo the tree. The base should be stronger so that the tree will be steady stand and not be the shaky one.
- Take the green color tissue paper and try to cut it into a small squares shapes. Make sure to cut it approx 2 inch by 2 inch size. If its bigger that it will not be look nice. and if its smaller then the size will be eventually be smaller only.
- Tell the little ones to perform this step, tell them to crumple each tissue paper square into a small ball shape. They will definately love this act and make it simpler to make.
- Get the gle at the starting point of the tree. i.e. bottom or say base of the tree. Tell the kids to glue the tissue paper balls onto the base, working their way up.
- Try to do this again and again. Continue gluing tissue paper balls, slightly overlapping them to cover the entire triangle.
- Noe if the entire tree is covered in green tissue paper, you may start the decoration part. Let your child glue swquins, glitters, small size of pom-pom and other recycleable materials on the tree to make it look like ornaments.
- Now make the top of the tree, glue a star at the top to make it elegant. For the addional dimension you may curl the strips of the tissue paper or news papers and glue them around the edges of the tree. This will represent as garland and it will look good too.
- See its ready now, display your fluffy tissue paper tree on a shelf.
Christmas Tree by Recycled Magazines
Materials Required:
- Old magazines or catalogs or news papers
- Scissors
- Glue
- Cardboard for the base stand
- Paint or markers
- Decorative items (stickers, glitter glue)
Step-by-step instructions:
- First thing base creation, For the base creation cut a shape of triangle from the cupboard. It will be helpful for the Tree base.
- Now from the news peper or magazines, netely cut out the pages with predominantly green colors. Try to cut it properly in one go and avoid multi cuts or smaller cuts.
- Fold each page in half lengthwise and then fold it in half again. This will give it a shape of the tree.
- Try to cut these folded paper into the pieces of strips, make sure to leave it maximum about an inch in size and uncut at the folded edge. This cutting works to be done by an adult and little ones may be observe the nitty gritty of this.
- Make the paper or magazine unfold so that it will reveal the fringe effect.
- Now, from the starting of the tree bottom side, its a cardboard triangle and now gue this fringed magazine strips on to the bases so that the fringed part seems to be outward direction. We need to do this again and again while overlapping each rows as it works in a way up the triangle.
- While do ing this, you may see that the entire tree is covered with it and now you may trim any excess paper around the edges. Be careful while using scissors.
- Decorate your tree with stickers or glitter glue to represent ornaments and lights.
- Its time to make the topper side of the tree, for making it just make a cut into the shape of star make this from any golden magazine page or from the yellow paper and now glue it to the top of the tree. You may use any recycled materials for its decoration purpose.
Conclusion:
Creating Christmas trees at home with the recycled material is a wonderful way to spend quality time with your children and also to celebrate the holiday sprit. These DIYs at home is not only result in unique decorations but also provide the opportunities for learning and skill development at the smaller age of the children. Each of these Christmas tree making ideas offers its own set of benefits.
Remember, always supervise children during these christmas tree making activities, especially when using scissors or other potentially sharp objects. The most important thing is to have fun and enjoy the process of creating together along with childern. These handmade Christmas trees will become unforgetable and joyful moments spent crafting with your little ones.
So, gather your supplies, clear a space on the table, and let the Christmas tree making begin! Your home will soon be filled with unique, child-made decorations that capture the true spirit of the season. Happy crafting!